Deploying AI Models
Learn how to deploy models from the catalog and integrate them into your applications using the Kloud Team API.
Deployment Process
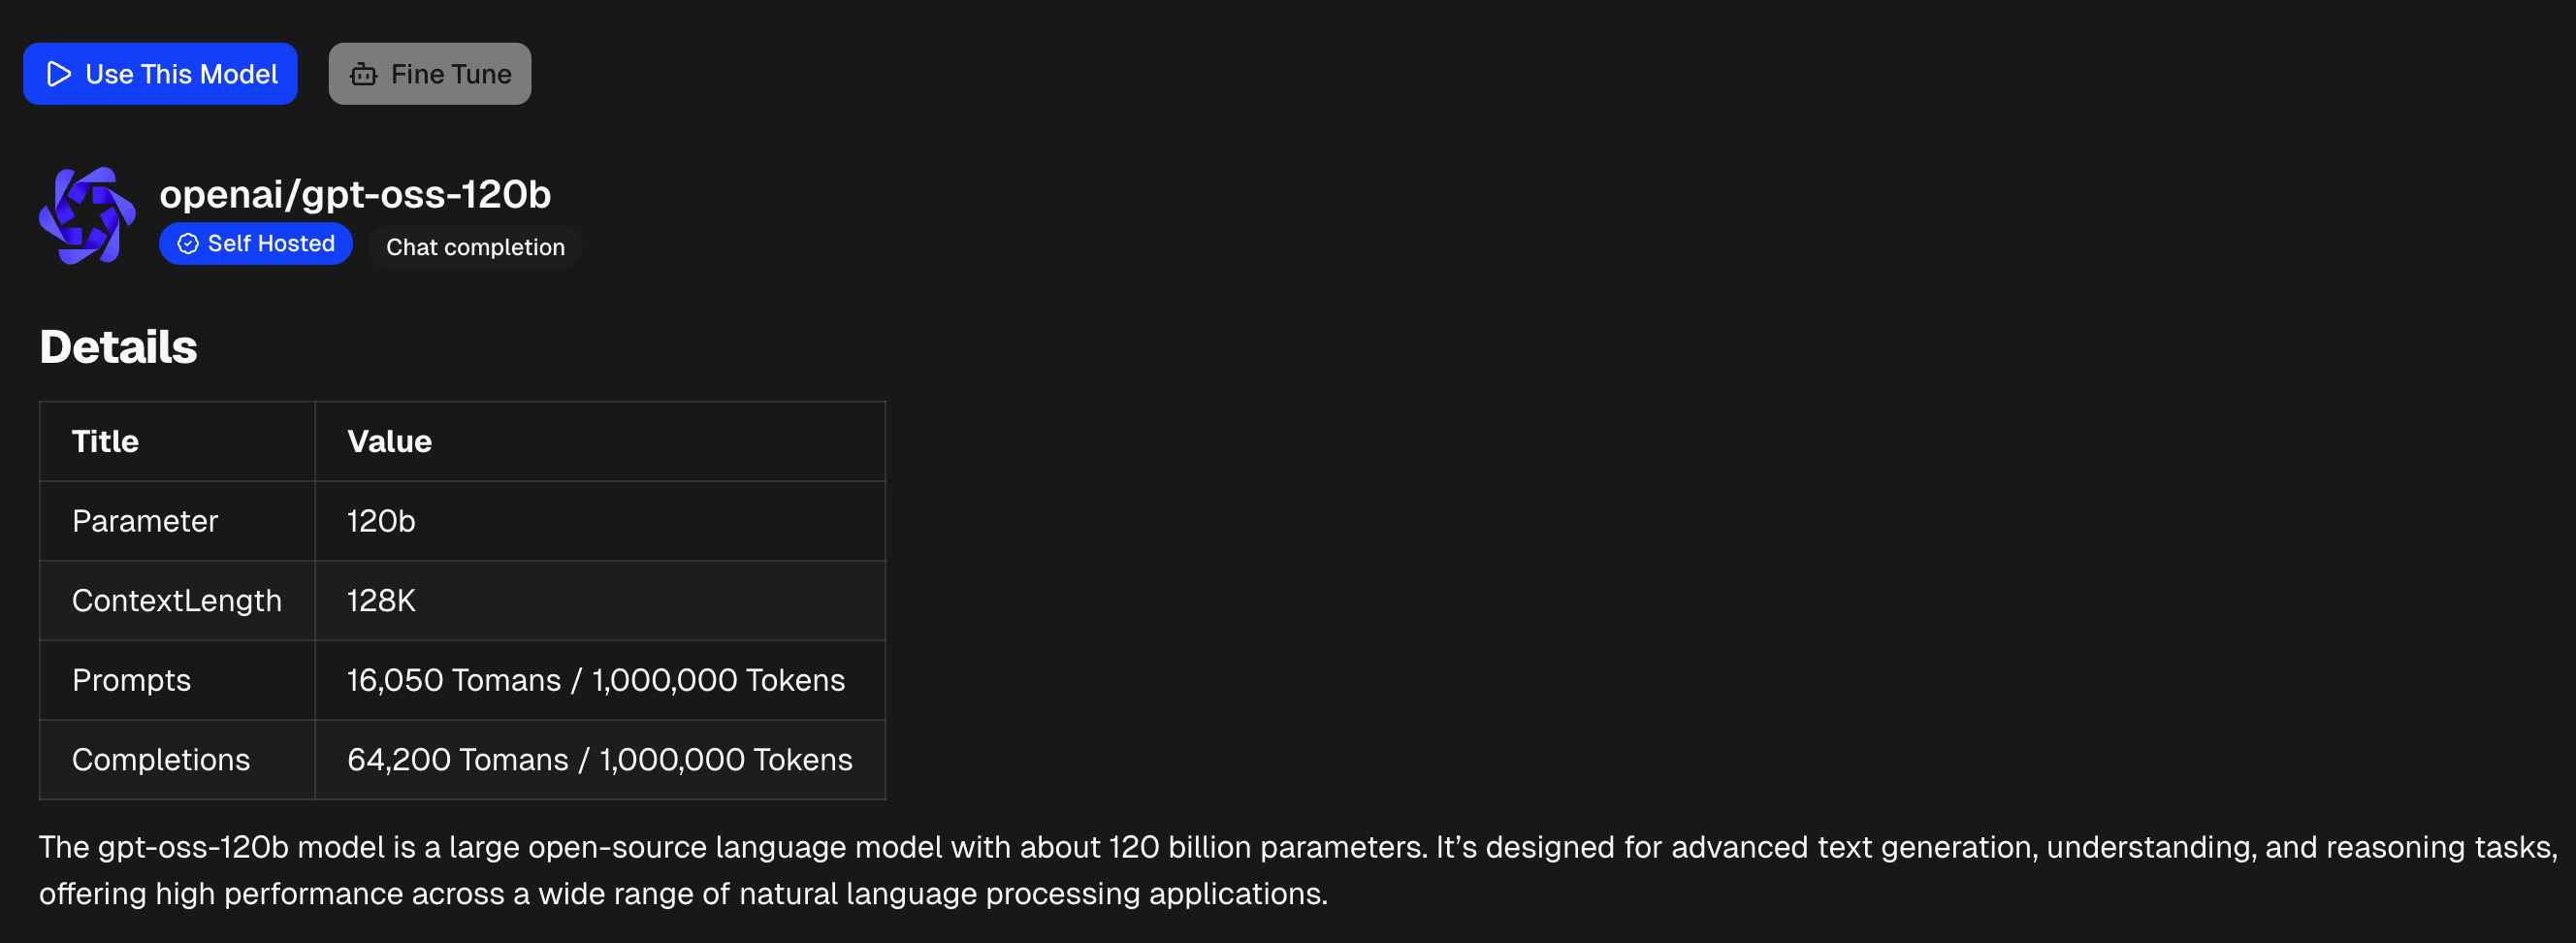
Select a Model
Click on the model card you want to deploy in the Models Catalog. Review the specifications and pricing.
Use A Model
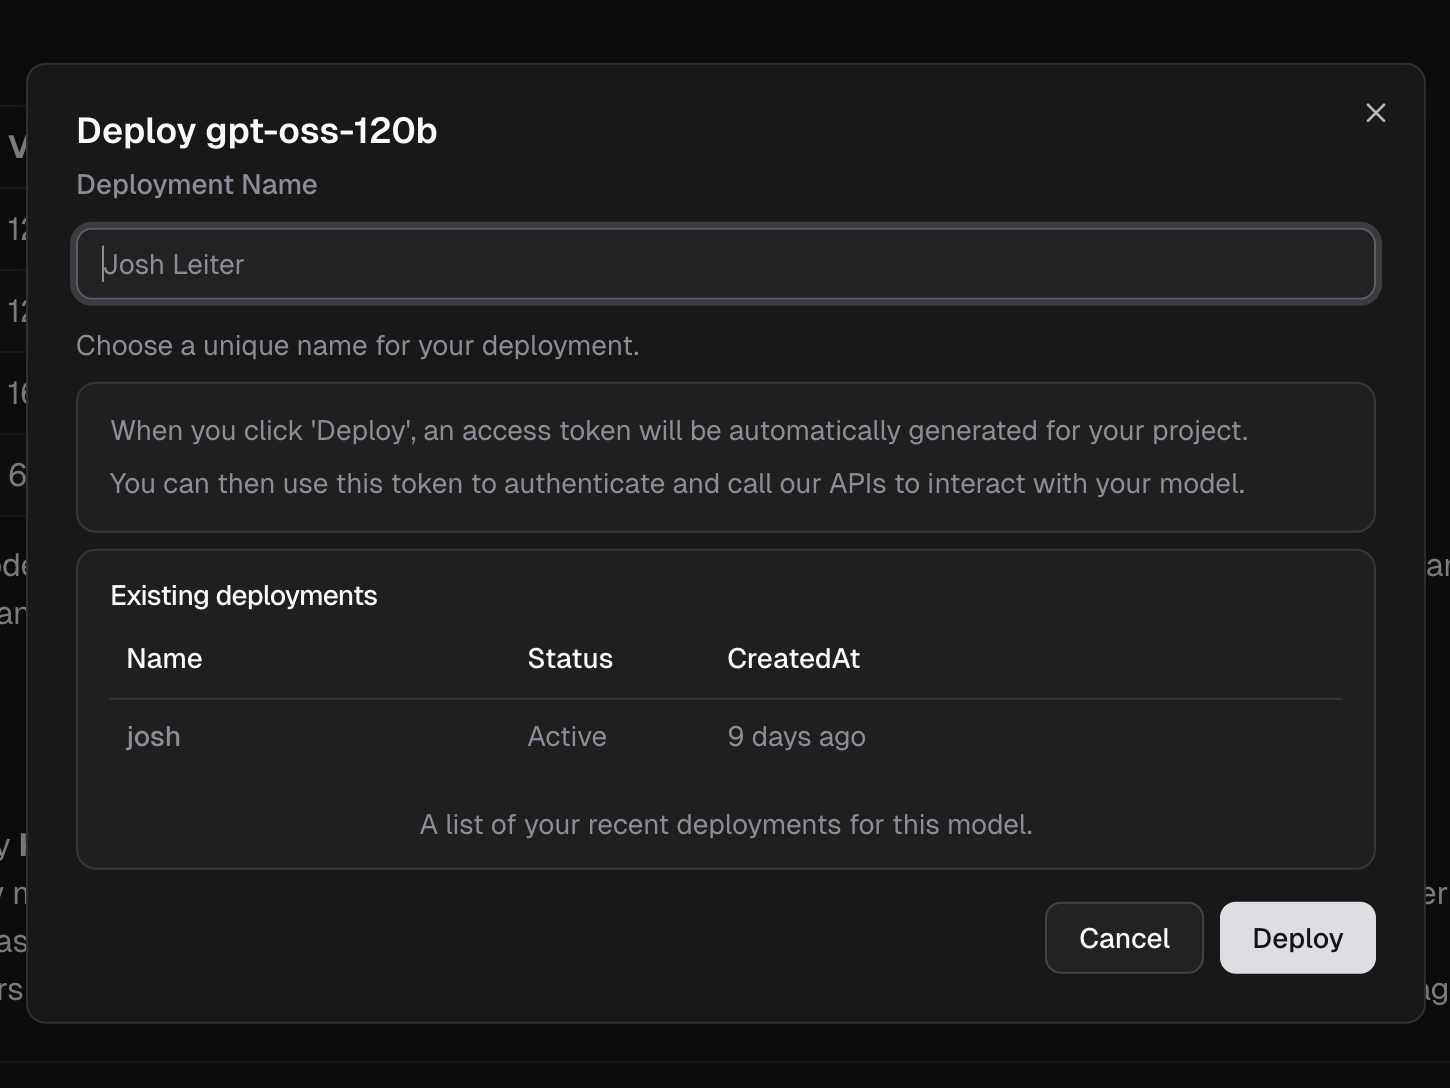
Use a model from catalog details page, click on the Use This Model button to create an access token and deployment for you.
Click Deploy to launch your model endpoint and access token.
Access Your Model
Once deployed, you can access your model endpoint and API key from the dashboard.
Getting Your Credentials:
Navigate to AI [Machine Learning] > Models > My Library in the dashboard to view your deployed models. Each model displays:
- Endpoint URL – Your model's API endpoint (e.g.,
https://llm.kloud.team) - Access Key – Your authentication token for API requests
- Model Name – The identifier to use in API calls
You can copy both the endpoint URL and access key directly from the dashboard by clicking the copy icons.

Dashboard Features:
- Monitor usage and performance
- View token consumption
- Copy endpoint and access key
API Usage
Chat Completion API
The standard endpoint for chat-based models (Claude, GPT, Grok, etc.):
curl https://llm.kloud.team/v1/chat/completions \
  -H "Authorization: Bearer YOUR_ACCESS_KEY" \
  -H "Content-Type: application/json" \
  -d '{
    "model": "your-model-name",
    "messages": [{"role": "user", "content": "Hello!"}]
  }'
Replace YOUR_ACCESS_KEY with the access key from your dashboard and your-model-name with your deployed model identifier.
Request Parameters
| Parameter | Type | Required | Description |
|---|---|---|---|
model | string | Yes | Your deployed model identifier |
messages | array | Yes | Array of message objects with role and content |
temperature | float | No | Sampling temperature (0-2), default: 1 |
max_tokens | integer | No | Maximum tokens in response |
top_p | float | No | Nucleus sampling parameter (0-1) |
stream | boolean | No | Enable streaming responses, default: false |
Response Format
{
  "id": "chatcmpl-123",
  "object": "chat.completion",
  "created": 1677652288,
  "model": "your-model-name",
  "choices": [{
    "index": 0,
    "message": {
      "role": "assistant",
      "content": "Hello! How can I help you today?"
    },
    "finish_reason": "stop"
  }],
  "usage": {
    "prompt_tokens": 9,
    "completion_tokens": 12,
    "total_tokens": 21
  }
}
Code Examples
Python
import requests

url = "https://llm.kloud.team/v1/chat/completions"
headers = {
    "Authorization": "Bearer YOUR_ACCESS_KEY",
    "Content-Type": "application/json"
}
data = {
    "model": "your-model-name",
    "messages": [
        {"role": "user", "content": "Hello!"}
    ]
}

response = requests.post(url, headers=headers, json=data)
print(response.json())
Node.js
const axios = require('axios');

const url = 'https://llm.kloud.team/v1/chat/completions';
const headers = {
  'Authorization': 'Bearer YOUR_ACCESS_KEY',
  'Content-Type': 'application/json'
};
const data = {
  model: 'your-model-name',
  messages: [
    { role: 'user', content: 'Hello!' }
  ]
};

axios.post(url, data, { headers })
  .then(response => console.log(response.data))
  .catch(error => console.error(error));
cURL
curl https://llm.kloud.team/v1/chat/completions \
  -H "Authorization: Bearer YOUR_ACCESS_KEY" \
  -H "Content-Type: application/json" \
  -d '{
    "model": "your-model-name",
    "messages": [
      {"role": "system", "content": "You are a helpful assistant."},
      {"role": "user", "content": "What is the capital of France?"}
    ],
    "temperature": 0.7,
    "max_tokens": 150
  }'
Streaming Responses
Enable streaming for real-time response generation:
import requests
import json

url = "https://llm.kloud.team/v1/chat/completions"
headers = {
    "Authorization": "Bearer YOUR_ACCESS_KEY",
    "Content-Type": "application/json"
}
data = {
    "model": "your-model-name",
    "messages": [{"role": "user", "content": "Tell me a story"}],
    "stream": True
}

response = requests.post(url, headers=headers, json=data, stream=True)

for line in response.iter_lines():
    if line:
        decoded_line = line.decode('utf-8')
        if decoded_line.startswith('data: '):
            chunk = json.loads(decoded_line[6:])
            if chunk['choices'][0]['delta'].get('content'):
                print(chunk['choices'][0]['delta']['content'], end='')
Authentication
All API requests require authentication using your Access Key:
Authorization: Bearer YOUR_ACCESS_KEY
Get your access key from AI [Machine Learning] > Models > My Library in the dashboard.
Security:
Keep your access key secure and never commit it to version control. Use environment variables to store credentials.
Error Handling
Common Error Codes
| Code | Description | Solution |
|---|---|---|
| 401 | Unauthorized | Check your access key |
| 404 | Model not found | Verify model name in dashboard |
| 429 | Rate limit exceeded | Reduce request frequency |
| 500 | Server error | Retry with exponential backoff |
Error Response Format
{
  "error": {
    "message": "Invalid API key provided",
    "type": "invalid_request_error",
    "code": "invalid_api_key"
  }
}
Rate Limits
- Default rate limits apply per access key
- Monitor usage in the dashboard
- Contact support for increased limits
Best Practices
API Integration
- Handle Errors Gracefully – Implement retry logic with exponential backoff
- Monitor Token Usage – Track consumption to manage costs
- Use Appropriate Models – Match model capabilities to your use case
- Cache Responses – Reduce redundant API calls when possible
- Set Timeouts – Prevent hanging requests
Performance Optimization
- Use streaming for long responses
- Implement request queuing for high-volume applications
- Choose faster models (Haiku, Grok) for latency-sensitive tasks
- Batch similar requests when possible